Wednesday, 31 October 2012

Touched By Love


Now, there is a story behind my cut-files this week. Well, I suppose there always is to be honest, LOL, but this design stemmed from me seeing a die-cut on a card which I thought looked lovely but although I knew the make of die, could I find it in the stores I regularly use?  As the card I had seen was a white on white one too, the actual intricacies of the design were almost none existent but I thought I would give my Silhouette software designing credentials a good work out and constructed my own variation/s of the cut out design I could see.

Yes, me being me, I have actually several variants of my theme, LOL - call it indecisive or call it giving myself a good start on another card. LOL. Anyway, it did involve giving those 'little grey cells' a good work out to use that new rotation tool, replicate & give that Modify button 'a run for its money' to arrive at my variants. On this one I used differing white card (matt, pearlescent & felt hammered) for a lot of the layering, adding definition with silver card which actually came with those tiny glistening dots all over it (nifty eh?), to peek out through the cut-work.

I chose this doting angel by Crissy Armstrong called 'Touched By Love' to be the centre-piece & I coloured her with Promarkers and gave the swaddled infant some extra warm bedding with a bit of paper-piecing.  I then added yet another layered cut file beneath it for my sentiment.

The insert has been kept relatively simple with a verse on one side and a circular sentiment on the other from Tracy Wray with enough room beneath to write when the time comes.


Of course, once I had completed my cut-file, I then came across the original die on a shopping site! Still, I had the fun of creating this one to my own specifications, even though it did take a bit of time to construct. Hope you like what I did with it too.

Tine :)

Challenges:
Addicted to Stamps - things with wings
Totally Gorjuss - things with wings
PaperPlay - things with wings
Christmas Card Challenges - Christmas (optional pop it up)
OLLCB - C is for Christmas
Crafty Pad - Christmas is coming
OSAAT - make 1 for Christmas
Crafty Hazelnut - no pattern paper
Christmas Stampin' - use a circle
Love to Create - lots of layers
I ♥ Promarkers - cute
Flutterby Wednesday - open challenge
Tammy's Scrapin' Corner - anything goes
Stampin' For the Weekend - anything goes
Anything Goes - anything goes.

Wednesday, 24 October 2012

Angel Tilda


I made a number of shaped stepper card designs a couple of months back but hadn't actually got around to using any of them. I did, of course, create them using my Cameo and I thought this particular Tilda perfect for my fancy shaped card.  What I did find in constructing this kind of shaped card was that it was better to add an extra strip of card underneath as a retainer. I had kept the weight of the embellishing elements to a minimum so that the card wouldn't just collapse down but a restraining bar added extra security so that the finished card could definitely keep upright when stood on a mantelpiece.

I am sure by now, that most of you know that I always use my Promarkers to colour in my images and my sitting Angel Tilda is no exception - but I also paper pieced her little dress. She is surrounded by more of my own cut-files in the shape of the poinsettia and leaves. I made these with cut out veins down the centre for a bit of extra interest. I utilised the cut out leaf veins as decoration in their own right as I thought they looked rather like frosted twigs.  The design paper mats were created as print & cuts on the Cameo (but I also needed to change the alignment &of & re-scale the dotty dp image too, ensuring that the smaller pieces I wanted to cut would to exactly match those on the larger shaped elements). The circular sentiment was from Sentiments4You.

I wanted the back to be 'fit to be seen', LOL, as well as giving me a place to write the 'to' & 'from' using similarly created mats as the front for the shaped back.


So I had also added an extra layer to my image's mat before I had adhered to the front - cutting it to be the same shape as one of the front mats, (as a print & cut featuring a sentiment from Bizzy Becs Store) but positioning it so that it would be seen from the back peeping over the top of the shaped card.


Tine :)

Challenges I would like to enter are:
Creative Card Crew - fancy folds
Cupcake Craft - paper piecing (dress)
Magnolia Stamp Lovers - spots & dots (embossed as well as on DP)
Rogue Red Head - dotty
I ♥ Promarkers - Christmas is coming
Totally Papercrafts - Christmas
Tilda's Town - Merry Christmas
Sparkles Forum Christmas - traditional Christmas
Magnolia Down Under - inspired by a song (Angel Child - Oasis)
Crazy - handmade flowers (made poinsettia cut file & the leaves)
Pink Gem - flowers
Anything Goes - make your own embellishments (poinsettia & leaves)
Hiding In My Craft Room - die cuts
Perfect Sentiments - bingo +front sentiment (flowers, die-cuts, dry embossing)
ABC Christmas - U (up to you)
Challenges 4 Everybody - anything goes
Fussy 'n' Fancy - anything goes
Cards Galore - anything goes
One Stop Craft - anything goes.

Sunday, 14 October 2012

First Snow


My followers, (certainly those who were with me during the last festive season), will know how I love snowflakes on a Christmas card. Any excuse & I will pop one on. LOL. So I am not apologising for using them again - in fact, expect more from me at some point so don't say you haven't been warned! LOL. Of course the difference this year is that I am using my Cameo to make my own variations.

The focal point on this card is that gorgeous image of 'Kai in the Snow' (Mo Manning) and I coloured him with Promarkers, paper-piecing all of his outfit (coz I like to paper-piece too, LOL).  I have surrounded him with grey-tonal snowflake papers from Jak Heath  but whilst my papers were devoid of strong colour, the same cannot be said for Kai, snug as a bug in his warmest clothes. I wanted him to be uber-colourful and added a touch of texture by giving him Flower Soft pom-poms. I did of course, also make the card base itself - a variation of one I had designed previously.

For the design on the card front I followed the sketch at CLP this month but rotated it, & then added the various snowflake elements I had created using my Cameo - including the snowflake mat rising vertically behind Kai as well as those glistening snowflakes dotted about as embellishments. Not that any sparkle is showing up too well on the photo of course. That sparkle, other than from the diamante gems, is from several different bottles of Stickles.


The card is basically a tent-fold, made in two pieces & the back section includes a cut-work snowflake panel (again one I made myself and suitably 'Stickled'), which can be seen when you open the card and the insert features a circular sentiment from Stamp Fairy.


Thanks for visiting my blog today. I really do appreciate your visits & comments so I know I am not talking to myself! LOL. Happy crafting!

Tine :)

Challenges I wish to enter this card into are:
CLP - design sketch (I rotated it)
Mo's Digital - 'B' is for..... baby Kai (aw...don't you just want to give him a hug!)
Oldie but a Goodie - inspired by a song (Baby, It's Cold Outside) - old stash used - image/flowersoft/card/papers
Craft Us Crazy - children &/or autumn/fall
Elke Kaart Een Feestje - deserves a hug (doesn't he just...)
The House that Stamps Built - masking (Kai so I could colour the sky)
Craftyhazelnut - snowflakes
Paper Crafting Journey - add some bling
Whimsy - all things sparkly
Sparkles Christmas -  traditional (can't beat snowflakes, LOL)
Christmas Cards All Year - either non traditional image with traditional Christmas colours or traditional Christmas image using non traditional colours
OSAAT - inspired by a song (Baby, it's cold outside)
Crafty Sentiments - anything goes
Deep Ocean - anything goes
Divas By Design - anything goes
Crafts & Me - anything goes
Eclectic Ellapu - anything goes
Through the Craftroom Door - anything goes.

Wednesday, 10 October 2012

Little Shepherd Boy


Well, another Christmas card to add to the collection, and this one features an adorable image from LOTV called 'Little Shepherd Boy'. He brings back memories of making an angel outfit for my daughter and a shepherd's one for my friend's son as they were in the school nativity play. How those years have flown by! This particular little chap with assorted cuddly toys has been coloured with Promarkers. You may have spotted too that I have been paper-piecing again, this time with the lad's headdress and the little toy up against the box 'manger'. Don't you think it looks cute in its checked fabric .... and don't I make life difficult for myself trying to cut those tiny bits out?!?!  LOL. Although I added some colour with these elements, I kept the rest of my colouring more subtle this time around as the papers (from Aimee Harrison) were colourful enough - chosen as they reminded me of the fabrics everyone seems to use for their offspring's Nativity outfits. Where would we be without the tea-towel headdresses? LOL

The inside of the card has matching starry borders.
The sketch I have chosen to follow is this week's offering from Sketch Saturday, so I layered my digital papers from Aimee Harrison Design Studios accordingly, matting it all up onto a card base I created myself using my Cameo and cut from a very substantial navy card - so basically giving myself stars in a night sky. I know..... but I keep myself amused! LOL. The back of the tent-fold card is a little smaller than the front piece so that the cut work edging can be seen properly. This back piece features cut work too echoing the stars of the front design but setting white behind one border for extra effect. I have used as you will have seen, two circular sentiment - the one on the front was from Bizzy Becs and the one on the inside of the card was from Marion at 'When the scrap hits the fun'.


Thanks for visiting my blog today.

Tine :)

Challenges I wish to enter this card for are:
Sketch Saturday - design sketch
Lili's Little Fairies - Christmas card for a boy
Elke Kaart Een Feestje - you deserve a hug
Craft Your Passion - square card
Crafting For All Seasons - costume/dressing up
Nutcrafters - paper piecing
Delightful - winter holiday
Sentimental Sunday - anything goes (+sentiment)
Incy Wincy - anything goes
Crafts and Me - anything goes
Creative Inspirations - anything goes
Deep Ocean - anything goes.

Monday, 8 October 2012

Siku & Shiya in the Snow


You can tell Christmas is a-coming when I am sat with bottles of Stickles on my craft desk and as I am now wayyyy behind in doing my Xmas cards I thought I had better get down to doing one more at least.

This one features the image of Siku and Shiya (by Mo Manning) rubbing noses for an 'Eskimo Kiss'. The adorable little girl has had her coat fabric paper pieced so there is a hint of a pattern in it and the image was coloured as ever, with Promarkers before I gave a bit of sparkle to the snow at their feet courtesy of the afore-mentioned Stickles.

The fabby blue design paper was one from Jak Heath a good while back and the white card layers between have been embossed with 2 different embossing folders - the 'Me to You' snowflakes of 'Winter Wonderland' and a Cuttlebug dotty one. I am sure that you cannot fail to notice all the extra snowflakes around the border of the card itself as well as embellishments. I have, of course, been busy with my Cameo making the 'snow' bordered frame onto which I had welded some of my own snowflake cut-files. Yes, I have a LOT of different flakes (got a bit carried away when I was designing them, LOL). Made in two separate pieces as I have done before, the back part of the card attaches just underneath the text of the card front to give me a traditional tent-fold but keeps the card front edges clean & clear for all that cut-work to show clearly and has the added bonus of all being able to be cut from a single piece of A4 card.  I used my favourite pearlescent card - do just love that sheen, especially for Christmas or special occasions.  I also added text and snowflake 'parts' down the sides of the back section - giving the flakes that sparkly touch too which I hope also emphasises the non-sparkling 'Let It Snow' sentiments in the middle of the cut out sections.


I cut the insert to lay over the back section of the card using a sentiment from TLC.


Thanks for looking!

Tine :)

Challenges I wish to enter this card for are:
Mo's Digital - anything goes
Nutcrafters - paper piecing (her coat 'fabric')
Holly Jolly Christmas - glitter & bling
Sparkles Forum Christmas - traditional Christmas (snowflakes have to be a seasonal fav)
Digital Delights - winter holiday
Stamp & Create - winter wonderland
Winter Wonderland - across the miles
Lollipop - something old/something new (old = my image/new = my cut file)
Sunday Stamper - JFF snowflakes
PaperPlay - shine on
Penny's - die cuts/punches
Christmas Cards All Year - either non traditional image with traditional Christmas colours or traditional Christmas image using non traditional colours
Sentimental Sunday - anything goes but use a sentiment (cut & printed ones)
Sweet 'n' Sassy - bingo (glitter, die-cuts, paper piecing)
Crafting For All Seasons - in a costume/dressing up
Clearly Inspired - use a sentiment (cut text as well as the printed internal one).

Thursday, 4 October 2012

Background card variations

Well, I managed to track down the cause of all my computer woes - a new external drive.

With all the messing about I have had to do trying to get the new drive to work, I have of course, had cards to post which I haven't been able to. Some have been diligently made but have been sent on their way before I have had chance to tell you about them. It didn't help that I couldn't post their photos to my blog either as the corrupted software for the said drive was not only stopping the card reader from working but preventing all attached drives, cameras etc. to the computer from being recognised - so no way to get photos to the PC at all. Grrrr. I even had to reformat the said new drive in the end. I was not a happy chappy! :(  Still, fingers crossed I should be OK now (well, I will know for sure if & when my new drive starts to do it's scheduled back up).

My aim with this one was to create a card suitable for a male without going down the fishing/yacht/beer/sport  route. There are some men that just don't fit into any of these categories aren't there and let's be honest, those images must get boring year on year. So no, I haven't coloured an image this time around (shock-horror! LOL).  To complicate things more, I wanted a design which was also 'young' enough for a twenty-something and accommodating enough to work just as well for an older gent or anyone else for that matter.

So I created a cut background using my Cameo (bit fiddly trying to get the positions of the welded design overlapping just as I wanted - always worth remembering though, the 'back' button is your friend, LOL). I then welded a square into the centre of my design as a base for my permutations and variation #1 was as you can see from the photo, one for a 25 year old (red & white - the colours of his football team) so I welded his age into a square to add to the centre.


#2 went to my brother in law (different football alliances, can you tell by the colours? LOL) and this time I cut a centre from a design by Bird's Cards, resizing to suit and didn't layer the central panel. I thought this one, with a more general birthday wish in the centre could be a great 'stand-by' card for those hasty last-minute makes and would actually work well for any age from teenager upwards, especially with the 'text-speak' message.


My aim for #3 was to adapt the design to create a more feminine variation of the same basic card design, using a digi rose background paper on the outside of the insert from Crafter's Companion's 'Love' CD and cutting with a deckled cut. I did re-colour it to suit my needs but they allow you to do that. :)  Using a solid centre to my cut-file this time, I layered up using a very dark navy and a floral design. I was in two-minds whether the flower's centre should have something in it or not but decided that it made the card 'too busy' so opted not to add anything further. I thought this variation of the design also lent itself nicely as an anniversary card.

Photographed this one with the insert to one side so you could hopefully see the deckled edging.
A helpful tip for cutting out backgrounds like this is to make sure you use a heavy-weight gsm. Might mean a double-cut, I certainly had to with each of them but there again, maybe with all this use my blade is going a little blunt!  All these three were in substantial card and yet they still wanted to 'bow' slightly at the opening edge due to the open nature of the design.

That's all for now then. Thanks for visiting my blog and as ever, thanks for your comments too.

Tine :)

Challenges:
Here Come The Boys - monochrome
Crafty Sentiments - happy birthday
Fab 'n' Funky - no patterned paper  
Digital Tuesday - text me (using digi cutter - and paper too on #3)
Creative Cutting - teenagers
Penny's - die cuts/punches (digi cutter)
Card Mania - handmade flower
Lexi's - pink
Dream Valley - pink
Papertake - anything goes (optional celebration).

Tuesday, 18 September 2012

Star


Real life has certainly been interrupting my crafting of late and just as I think I am getting back to some semblance of normality my technology thinks otherwise.  Have I had problems with my computer & all it's related gadgets!  Computer, hard drives, card readers, software: all are playing me up!  Won't bore you with the details - just don't be surprised if I vanish again. Still, I did manage to get this one posted so I hope it was worth the wait. LOL.

I coloured the LOTV image (Star of Wonder) with my Promarkers - but of course, that is only half the tale as I also paper-pieced her woolly pully, skirt & boots so she is at least as snug-as-a-bug in her snowy scene. The papers I used for this, like the ones in the background are all from Ashalee Wall.  As for that glittering & glistening snow, that at her feet, alighting the tree & star not to mention falling from the heavens is courtesy of a couple of bottles of Stickles. The little snow-drifts surrounding all the layering isn't my usual distressing/acrylic paint but a new product to me, that of Aleene's Glitter Snow. As far as I can see, it is a bit of a misnomer as I cannot really see any glitter showing. Vaguest of traces whilst in the pot, but not exactly visible on the card itself. Well, I tried! LOL. Another snowy element is that of the Martha Stewart snowflake punch towards the bottom of the card and to finish it all off, extra pearly embellishment (from MeiFlower) and 'girly' lace across the top made by Offray.

The sentiment circle I made myself using my Cameo, echoing the star subject of the image, naming, framing and welding my various sized stars together before cutting out of pearlescent card, the same as I used for the card-base itself.


Hope you all like it!  Right, back to the beeps and whirls.....arghhhh!!!!!!!!!!

Tine :)

Challenges I would like to enter this card for are:
Inspired By Stamping - sketch
Lili's Little Fairies - bingo (pearls, lace and glitter)
Pretty Little Ribbon Shop - lace & pearls
Ladybug - Christmas cupcake imagery inspiration
Little Miss Muffet - writing/ text (I cut mine)
PaperCraftingJourney - sentiment
Creative Card - tree
Lollipop - at least 2 punches/dies
Sassy Cheryl - die cuts (digi cutter)
Penny Black @ Allsorts - (stamped images) Christmas
That Craft Place - bling (pearls & sparkle)
Creative Cutting - anything goes (using SVG cut file or similar)
Creative Craft - anything goes
Tammy's Scrapin' Corner - anything goes.


Monday, 13 August 2012

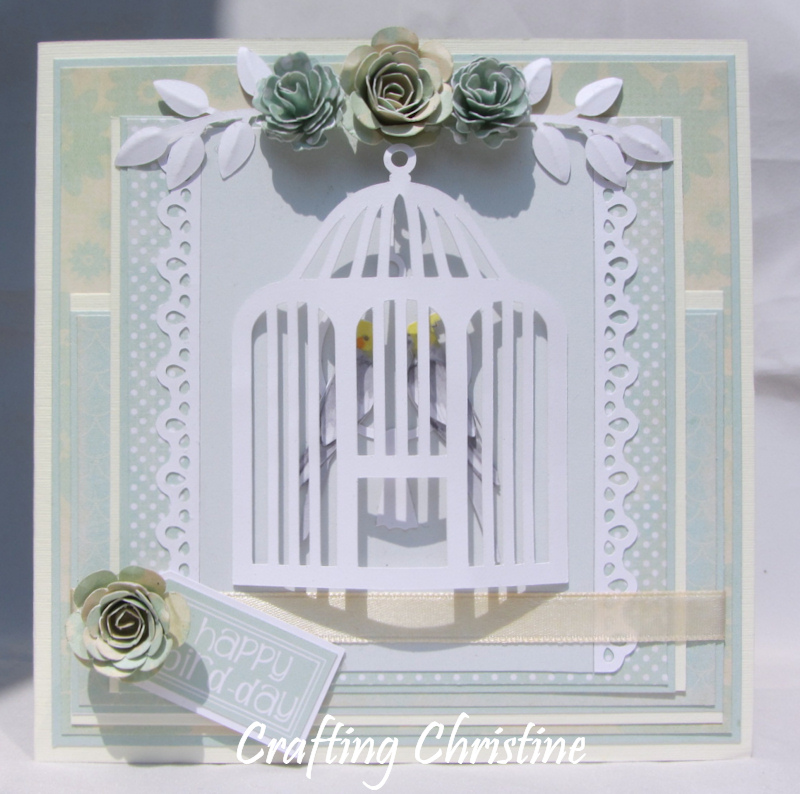
Mandy's Birds


Yes, I have indeed used Promarkers on my card this week it is just a little more 'discreet' than one of my 'normal' creations - if there is such a thing as 'normal!' LOL.

The card is for my sister-in-law who dotes on her two cockatiels.  As I like to make cards appropriate for my family & friends, a bird themed card it was - and whilst you probably can't see them very well hiding away behind the cage, I made myself a 3-layered cockatiel cut file and coloured each one with appropriate cockatiel markings using my Promarkers. The wings were put on with a dab of glue-gel so I could add dimension but of course, you can't see it properly because of the cage. LOL. Don't I make things unnecessarily difficult for myself? LOL. I then made a circular tasselled perch for them both to 'stand' on.

You can if you look carefully actually see the layers of the birds.
I didn't however, make the bird-cage itself.  This time I used one from a selection (birdcage3- from the appropriately named, Bird's Cards), bowing it out to accommodate my avian twosome.  Bird is also responsible for the two larger flowers (rolledflower1), I cut out of printed card stock, the leaves (branches1), which I embossed to give me the veins and even the sentiment, though I did re-colour this and put it in a tag. The smaller two flowers were a 5-petalled cut file from Pamela Conner, (thanks Pam).  I often have a love/hate relationship with my glue-gun when making my flowers. I need the fast-fix the glue-gun offers but I am useless at getting the right amount of glue out of it for my needs and then there are the copious amount of 'strings' emanating out of it. They go everywhere!!! LOL. Still, back on to the subject of my card,  I then got out my Promarkers once more and coloured my white satin ribbon with Ivory.


Now, of course I couldn't leave it there could I? LOL. So for the inside of my card I repeated my layered cockatiels but this time they are much larger - and just as naughty as my sister in law would recognise. They are coloured with Promarkers. One, slightly more placid cockatiel is just holding a recoloured greeting (from Bird's Cards) in his two-layered beak but the other mischievous creature is playing his favourite game of sitting on the picture frame and picking the wallpaper off!!!!  Yes, that is how they repay her when she allows them some freedom. LOL. As for the cut files here, other than the birds, I enlarged the same perch as I had created on the front and also made a bell hanging from a chain (with my SIL's name at the bottom). I added the layered frame so I can write the 'from' on later and this is 'hung' using some crochet thread onto the picture rail.


Thanks for looking.

Tine :)

Challenges I would like to enter are:
Great Impressions - walk on the wild side (animals but I hope Mandy's mischievous birds count! LOL)
That Craft Place - things with wings
Clearly I Stamp - things with wings
Scrapbook Sisters Card Challenge - things with wings
Digi Doodle - things with wings
Can You Digi It - bird is the word
Wags 'n' Whiskers - birthday
Corrosive - birthday
Divas By Design - for a female
Dream Valley - die cuts/punches
Poodles Parlour - die cuts
Totally Papercraft - frame it
Tammy's Scrapin' Corner - add flowers
Unstampabelles - paper flowers (no stamp or digi image either - for once I can comply, LOL)
Hooked on Craft - celebrate
Paper Crafting Journey - anything goes.