Thursday 30 September 2010

Digi Doodle GDT #27 - 3D


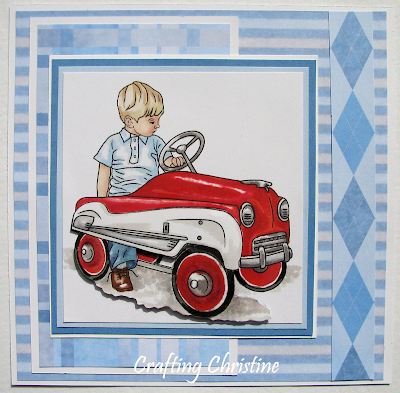
Well, this is my last card for Digi Doodle as GDT for September. I hope the ladies of DDSB have enjoyed me playing along for the past 5 weeks. The theme for this particular challenge as you can see from the title, is to have some form of dimension to the card and I have chosen to use silicone glue to decoupage the image of ‘Boy and Vintage 1st Car’.

He looks a little distracted doesn’t he? LOL. Fab car though isn’t it? You can imagine getting a car like that for Christmas and itching to go outside to play….but then realise it is pouring with rain and all you can do is sit there in the house, feet poised on the pedals ….and hope! Then your mum calls for you to get out of the car as you will leave marks in the carpet…. LOL.

I have used boy-like papers, (well, they are blue!!! LOL), hopefully in keeping with the era that this young chap comes from, and he just has to have of course, a bright red car. Shoes though are the obligatory ‘tan’ (did they ever come in other colours?). All coloured with Promarkers, I brought the ‘wing’ of the car forward for my dimensional element, using a slightly smaller amount of silicone glue towards the back of the car compared to the amount at the front so that it lies closer to the background towards the back than it does at the front. I hope you understand what I mean. Neither did I want to give it too many layers as it can sometimes look odd and disproportionate, especially from the side-view. Not to mention the cost of postage these days for anything other than pancake-flat mail!!!!

I have enjoyed my time as GDT, and will no doubt play along with some of the challenges in the future. Right, I shall bid you all ‘adieu’. Hope you all like today’s efforts enough to leave a comment as you go along and I thank you for them in anticipation.

Tine :)

Other Challenges for this card:

Crafty Calendar – blue (well, it’s mainly blue – just with a red car!….hope that still counts..if not then please just discount this entry) :)

Karber – hobbies & leisure

Crazy – no ribbons or buttons

Mami Doodles – boys card (using red somewhere)

Incy Wincy – anything goes.

Wednesday 29 September 2010

#34 Pearls and Swirls


The DT at I ♥ Promarkers are all using images from Pollycraft for the latest challenge. My choice was to add ‘pearls & swirls’ to this darling image from their Lilybean Fairies range – Clover Butterfly Wishes. Isn’t she a cutie, with such an innocent face?

Needless to say, I coloured my image with Promarkers, adding a touch of Stickles to her wings and those of the butterfly she is conversing with. I used just the one background paper, running it in a broad horizontal sweep across the centre of my square white card. For my ‘swirl’ element, I stitched the meandering path of two Martha Stewart punched butterflies as well as slightly haphazardly around the periphery of the card itself to indicate that the butterflies had been there also. It also echoes the swirling sinuous plants alongside the toadstools on the image itself I think.

The butterflies were punched from card I had coloured on both sides with Promarkers, and were given a short burst of Crafter’s Companion Spray & Sparkle which also stiffened them, helping to maintain the ‘fluttering’ state I had moved their wings into. For the pearl element of the challenge, I added flat-backed pearls and dabs of pearl dimensional paint to the butterflies’ paths - but also to the ‘dots’ on the toadstools. I created my own larger toadstools to complement those on the image, adding the pearl painted dots to them also before using silicone glue to add them to the card.

This was one of those cards where I could see the card the minute I saw the image so I hope you all like what my head had automatically created!

Tine :)

Challenges I will be entering this card for:

Stamp Challenges – Fall (autumn) colours

Stamptacular Sunday - Fall (autumn) colours

Craftalicious – autumnal colours

Crafty Catz – stitching

Allsorts – plain & simple

Paper Sundaes – things with wings

Charisma – anything goes.
Tuesday 28 September 2010

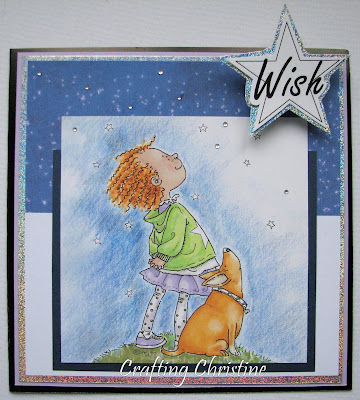
When you wish upon a star…..


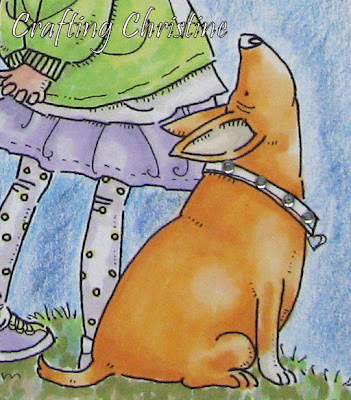
For my card today I have chosen an image featuring Bella & Bronte, that of ‘Stars’ from Mo Manning & specifically for the challenge this week which is ‘bling, bling & more bling’. The bling on this particular card consists of the diamante ‘stars’ and the gem encrusted collar Bella sports - not to mention the holographic silver card used on the mats.

I coloured my image with Promarkers, though used Caran d’Ache for the sky. I was going to do just a narrow outline around Bella & Bronte, but just started to get carried away with it until I had not so much the pure blue sky of the countryside, but the mottled & somewhat polluted skies for her to gaze into. The one and only paper used is a night sky dp from HOTP, (such minimalism is perhaps due to the few white on white cards I have done recently! LOL), and serves as an extension to the coloured sky of the image. I created the star with the word ‘Wish’ on the PC before cutting it a sparkling mat and adding a strip of acetate behind, folding this strip over so that the star stands dangles proud of the card but can lie flat for posting.

Challenges:
Mo's Digital – bling

My Partner in Crafting Crime – clean & simple

Allsorts – clean & simple

Sentimental Sundays – sentiment & dimension
Crafty Emma - animals

Everybody Art – friends.
That's all for today.
Tine :)

Thursday 23 September 2010

Digi Doodle GDT #26 Emboss it


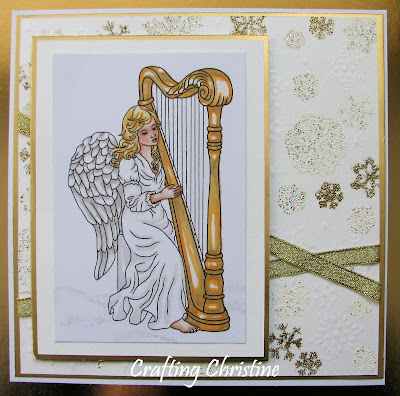
Yes, it doesn’t matter whether the embossing is dry or wet; just get that dimension onto your card! Me, well as you can see, I chose the ‘why not both’ route!

I decided to work with the beautifully elegant ‘Angel with Harp’ image from the Digi Doodle Shop, giving myself a white and gold colour theme for this angelic card. Once coloured with my Promarkers, adding a few light clouds at her feet, I also ran an embossing tool over the feathers of her wings, which just doesn’t show up in the photo but it doesn’t matter too much, as the main embossed area is on the background. The angel’s mat is raised using foam pads. This background is softly pearlescent card stock, onto which I firstly embossed snowflakes using different brass stencils, scattering them about with a the aid of my light box before getting out the heat gun and using both gold and ‘Snowflake’ embossing powders from Heat It Up and a number of different snowflake design stamps. The lurex ribbon, secured with double-sided tape, is from Dovecraft.

Other Challenges:
Our Daily Bread - white & bright
Prairie Fairy - embossing

Alys - glitter and sparkle

Corrosive - unused stash (the lurex ribbon - & trying to stick it down reminded me why it was unused!!! LOL)

Fussy & Fancy - Christmas colours (not green & red, but white & gold is pretty Xmassy to me!)

Sew Many Cards - embossing

Flutterby Wednesday - all winged things

Tuesday Taggers - it takes all sorts

A Spoonful of Sugar - anything goes.


Hope you like this card enough to leave a comment today, as I appreciate every single one.

Tine :)

Wednesday 22 September 2010

#33 White on White


There is a colour theme over at I ♥ Promarkers this week, or should that be a ‘non-colour’ theme? LOL. Yes, that’s right, the only colour allowed this week is on the image itself. Forget all those printed papers lying expectantly in your cupboards, they are not needed today. Now don’t panic!!!! The idea of white on white is not as daunting as you might think – after all, how many times have you grabbed for cardstock and found it a slightly different shade of white to what you were using? Then there is texture. Add a good dose of that and with your varying shades of white cards & papers you could end up with one very classy looking card. Well, that is the theory….LOL, and what is more, it could be particularly useful for Christmas cards if you need to get yet another done!

The DT are all using images from Digi Doodle for their ‘white on white ‘cards and I have chosen to use ‘Angel 1’. I printed her out twice, once onto card and once onto vellum. On the vellum angel, I turned the image over and carefully worked onto the reverse side with an embossing tool to highlight the feathers on the wings before cutting it out. Embossing also gave a bit of shape to the wings as well as whitening them. I then coloured the card image to show the shaded areas of her robes and again cut her out but this time her wings were removed too so that the card body could be attached to the vellum wings. Now, sucker for punishment that I am, I even kept my angel devoid of colour other than the bunch of flowers she is carrying and the garland around her head, & to these areas I added ’Summer’ Flower Soft for even more texture.

The cross consists of two layers, one of vellum onto which I pricked out a border before adding an embossed one, (all done on the reverse side), and this was mounted onto a slightly larger cross cut from pearlescent cardstock. I used the same pearlescent card for the embossed rectangle behind the cross and added ‘Star Dust’ Stickles over the proud surfaces for added interest. A Martha Stewart ‘Punch around the page’ gave a fabby border to very glossy photo paper when I couldn’t find my glossy cardstock for the layer behind that. Worked quite well though, and gave the same effect! I then popped flat-backed pearls (symbols of tears) onto the corners of the cross. Once done though, I had to photograph it with a black background, or you wouldn’t know where the card finished and the background began…LOL.


The vellum angel showing the detail on her wings.


Challenges:

CLP – design sketch (turned upside down, which creates a cross)

Alys – sparkle and glitter

Prairie Fairy – embossing

Fussy and Fancy – Christmas colours but anything goes (white as snow, red & green flowers)

Gingersnaps – GC70 –punches.

Our Daily Bread - white

Incy Wincy - white

Tuesday Taggers - it takes all sorts.


Well, that's all for today's post. There are currently a few 'white on white' challenges on the go. Why not join in? For more inspiration, do visit the other members of the DTs blogs to see how they created their cards for this week's challenge....and don't forget to use your Promarkers to colour your image in or your entry won't count!!!!!!!
Take care.

Tine :)

Friday 17 September 2010

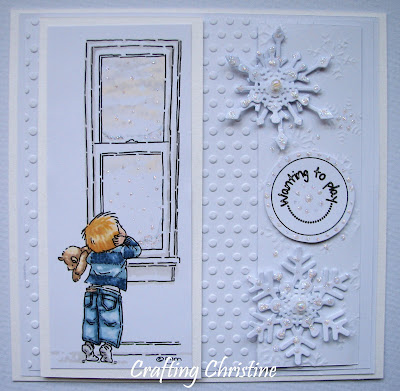
Wanting to play


Challenges:
Mo’s Digital – white on white

Charisma – sketch

Stamp Challenges - digi

Sew Many – wet or dry embossing

Paper Pretties – pearls, rhinestones or glitter dots

Aly’s Sunday – glitter & sparkle.

Today’s card uses the gorgeous digi image, ‘Jack Waiting’ by Mo Manning. I have interpreted him on this occasion gazing longingly out of his window, watching the snow falling & just hoping that he could go outside to play in all that cold stuff. I have coloured the image with Promarkers, going for a 'heavy with snow' sky, and kept the room devoid of extra colour to concentrate on the little boy himself.

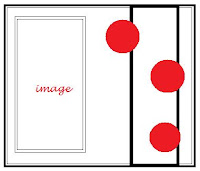
The sketch from Charisma this week seemed to work so well with the linear format of the image, the other rectangle enforcing the snow themed elements. The large snowflakes have been created from a Marianne Creatable die, a couple of snowflake sequins, iridescent beads & Stickles. I had actually sprayed iridescent sparkle from Crafter’s Companion on a couple of the snowflake pieces, but it just wasn’t sparkling for some unknown reason. (Could be my eye sight going though, LOL). On the snowflake panel I used a selection of brass stencils, hand embossing randomly and then touching the tips of the designs with Stickles. The large background card was embossed with an embossing folder. The sentiment was created on the PC and again Stickled for extra glitz.

Hope you all like today’s card, and I thank you for your lovely comments.

Tine :)

Thursday 16 September 2010

Digi Doodle #25 – View from the window


Digi Doodle’s #25 (GDT) - Anything goes…BUT….

…but indeed, as it is not quite ‘Anything goes’! We have been asked to select from a choice of 3 images this week at Digi Doodle, the selection being from between a baby in a bath, a branch of acorns or the church through the window; which was the one I eventually decided to play with. To play along this week, just choose one of these provided images …can’t be bad, eh? The Challenge this week is to enter your card for as many other challenges as possible and this is how the winner this week will be decided. So, if you have browsed through to my page from anywhere other than the Digi Doodle Challenge page, I am sure you want to get there pronto to get your freebie images. Try to resist for now, LOL, and finish reading my post , and as a reward, I will pop a link to the site at the end. :)

For my layout, I used the design sketch at Friday Sketchers, though rotated it, and decided to use the colour palette suggested by the Colour Create team this week (red, gold, white/cream) before starting to colour in with my Promarkers, hoping to achieve a somewhat snow- laden sky for this tranquil scene. Went for trees ‘touched with snow’, or so heavily burdened by it, that it has fallen off the branches, rather than just white spruces. I also used a gold gel pen to highlight the cross on the spire, and a digi paper from Crafter’s Companion to paper-piece the heavy brocade curtains – well, I hope they look like heavy brocade curtains now that I have gone over the paper-piecing with my Promarkers! I used the same paper for the lower half of my background ‘wall’ (this is a well co-ordinated house, even if they do like flocked wallpaper, LOL). The top half of the ‘wallpaper’ is also from C.Companion, though from a different set, but I thought they went rather well together considering. I chose a crimson red as I thought it more ‘homely’ than a bright, vibrant red, to get the right kind of feel. The white embossed diamond shape hopefully emphasises the snow element to the picture, but with the tiny paper chain across the top, I hoped to enforce the idea that we are viewing the scene from inside a house.

Right, that’s my thought process for this one, LOL, so I hope you like it after all that!
Tine :)

Other Challenges: (Don't usually go in for this amount...but it's the rules at Digi Doodles this week! LOL)
Friday sketchers – sketch
Crafty Catz – paper piecing
Colour Create – red, gold, white/cream
Prairie Fairy – embossing
Christmas Card Challenges - Xmas trees
Fussy and Fancy – Christmas colours
Alphabet - trees
Bah! Humbug! - favourite medium (digi & Promarkers)
365 Cards - #193 Tools & techniques - Promarkers and paper piecing
Tuesday Taggers - diamonds are forever (embossed white diamond)
Gingerloft - anything goes.
Right, here is the link to Digi Doodle Shop's Best Challenge! All winners (1st, 2nd & 3rd) will receive a gift for this challenge ...so good luck :)

Wednesday 15 September 2010

#32 Rip It Up


At I ♥ Promarkers this week there is a sketch by our very own Wynneth, (and there is an optional extra of ‘rip it up’ if you are brave enough to rip or tear your beloved stash! It could be worth your while though, as we are being sponsored this week by Simon Says Stamp. If paper mutilation happens to be a step too far and you cannot bring yourself to even do a controlled tear with a tearing ruler, then just use the sketch. LOL.

I wanted to try to make my card look like pages torn from a book. I used one of the images available here, from ‘The Waterbabies’ to illustrate my distressed ‘book’. The image, coloured with Promarkers, was cut into an oval using a large deckled-edge die from Spellbinders and the edges were given a wash of Tea Dye Distress Ink, as was the layer of card behind the image, which had edges torn using a tearing ruler to give the effect of an old bookplate. This was mounted onto matt black card to define & accentuate the teared edges more. The effect I hoped to achieve on the next layer back was as if it was a page torn from its binding. I found an extract from the book and popped it onto white paper and then cut down the left edge, but used the tearing ruler again for the other 3 sides. I then used a distressed ink wash carefully over it and once dried, I used the sewing machine without thread to create the dots down the straight edge and got my ‘quik unpick’ tool to cut down a number of the holes to the outer edge. I hoped this would look like the page had been ripped out of the book. From there I added a touch of gold ink to the other 3 edges as classic old books often have gold edges.

The vertical strip on the sketch I chose to see as the spine of the book itself so tried to find a suitably leather-like paper to which I added the title and author on the PC before cutting out and using the Tattered Rose Distress Ink to add depth to the edges. I then added a touch of gold gel pen to the lettering as if it was wearing away with age. The main backing paper is a recoloured freebie available at Mygrafico. It is by Lindsey’s Stamp Stuff and fortunately they don’t mind you altering the colours of the watercoloured image paper which I did in my graphics program to fit in with my colour-scheme. Having printed that off, I again cut down the left hand side but tore with the tearing ruler down the other 3 sides and the Tattered Rose ink again did its job around the edges. An Anna Griffin stamp then defined the top right hand corner in gold ink.

I made the flower from scratch myself from paper printed on both sides with the recoloured watercolour design. I then cut out free-hand with scissors a few layers of scalloped circles, distressed the edges of each layer, screwing them up and inking the edges with more Tattered Rose ink before securing together and using 3 brads into the centre.

Other Challenges:

Sir Stampalot - distressed
Stampman - distress
Stampin' for the Weekend - shabby or vintage
Allsorts - colours of Autumn (just browns)
Lexis - flower
Gingerloft - anything goes.
That is all for this post folks. Have a good day!
Tine :)

Tuesday 14 September 2010

Fancy Fold Fairy Flora


Challenges:
Mo’s Digital – fancy fold & flowers

Cute Card Thursday – play on words
Pocketful of Posies – floral fantasy

Lexi’s – flower power

Shabby Tearoom – inspired by nature (or use inspirational photo)

Karber’s – card for a girl

Charisma – something new (the fancy fold)

Everybody Art – different card shape

Hi all. I had fancied making a card with one of these folds, and the challenge at Mo’s this week gave me the opportunity to try it out. Using the gorgeous image of Fairy Flora, (from Mo’s Digital Pencil, of course!), I sat little Flora amongst the daisies and coloured her accordingly. After all, if she wasn’t blending in so well, we would be seeing fairies all the time? Right? LOL. Anyway, I kept the colour palette fairly simple (or fairy simple!...sorry, couldn’t resist LOL), using my Promarkers, the only hints of other colours showing in her shimmering wings. Everyone else might be doing Autumn colours but Flora here is definitely still in Spring mode. The paper is recognisably K & Company and I used a Marianne Creatable die to cut out the extra daisies, which were added to the side panels as well as the front panel. The sentiment, featuring the play on words, the challenge this week at CCThursday is from TLC.

Hope you like today’s offering to blog-land!


Tine :)

Thursday 9 September 2010

Digi Doodle #24 Charm Me - Rhinestone Cowgirl


Other challenges:
Everbody Art - make your own flower
Lexi's - flower power
Crafts and Me - gems & sparkle.

Today’s card as GDT at Digi Doodle, depicts one of their more recent additions to the range, that of ‘Cowgirl and Horse’. As the theme this week is to use a charm, out came my lucky horse-shoe from my stash, though to be perfectly honest, to be lucky, the horse shoe should be the other way up. This way the luck falls out! Still, I didn’t make the charm and it looks odd when I try to use it the other way up!

Why did I choose this particular image to work with? Well, the horse is my favourite animal so I couldn’t resist it. Simple! LOL. The image is basically coloured with Promarkers, though I chalked the sky and grass background on the image as I wanted a light and airy feel, an indication of a wide open space. I also paper-pieced the yoke of her denim jacket and its turned-back sleeves with a light blue and white tiny gingham check. It was only when I had got it all together that I realised that it is all but identical to an outfit I made myself a long time ago….LOL. Mind you, I didn’t add any rhinestones to mine. The old, worn painted fence posts seemed right but it took me a few minutes to decide on what colour to use for my faithful steed. Should he be a dun, an Appaloosa maybe? Went for a grey in the end as you can see, but it was a close-call.

The lower part of the background I have portrayed as a stable door, complete with a ‘metal’ top so a bored horse can’t chew at the wood (cribbing). This ‘metal’ is lovely matt mirri board with two punched circles also in the mirri, to represent the rivets holding the metal in place. The wood of the door was created from a paper from a ‘Cardmakers pack’ from HOTP, but I went over it with a Promarker to make wood-like knots and lines in it before I de-bossed the individual planks. The de-bossing didn’t show up too well, so I turned the paper over and used the same Promarker to draw onto the embossed lines. As the Promarker bled through the paper, it helped to show the delineation of the de-bossing better. The sky printed paper is also from the HOTP pack.

The flower was created using a Marianne Creatable die and some denim which I had around from turning up my daughter’s jeans. I frayed one edge and gathered the other, popping a big red rhinestone on top to match those on the girl’s jacket. I used some dried coriander stems from my garden to represent hay or straw.

Right, enough of me prattling on….why not join in the Digi Doodle Challenge yourselves…just remember to use a charm on your card this week.

Tine :)

Wednesday 8 September 2010

#31 His own transport!


Hello again, and the theme this week at I ♥ Promarkers is ‘Transport’. With this in mind, I chose this youngster leaning on his VW clutching a set of car keys. The image is ‘Mikey’, part of a set from Charmed Cards and Crafts, and I have depicted him as just having passed his driving test. He is of course, coloured with Promarkers.

For the backing paper, I created my own, making a light grey road with white central marking and then layering my own created tyre marks on top of one another before dotting with a few motoring signs I made on the PC. The ‘L’ plate was also created on the PC before I used pinking scissors through the centre. The sentiment, also concocted by my good-self on the PC, hopefully reflects our licence plates. Now please don’t tell me that there should be more stars on the European sign, I do know, but my excuse is that it is the same reason that cartoon people don’t have 5 fingers – it looked better. LOL. The mats are navy blue, red and silver mirri, though the one behind the ‘L’ plate looks brown rather than silver.

Right then, do go and browse the DT’s blogs for inspiration and see how they created their cards this week, then get out those Promarkers and create a card with a ‘Transport’ theme for yourselves….thinking caps out…. & I look forward to leaving comments on your blogs.
Tine :)

Challenges for my card this week include:
Crafty Creations - transport
Charisma - song title (Cars - Gary Numan)
Allsorts - new beginnings (the start of life behind a wheel).
Cupcake - books (Highway code)
Karber - for a boy
Crazy 4 Challenges - books (Highway code)
Cowgirl's Sunday - anything goes.

Tuesday 7 September 2010

All Shook Up


Challenges:
Polka Doodle – shaped card

Creative Inspirations (Sat. Challenge) – shaped card

Secret Crafter – clean and simple

Crafty Cardmaker – clean and simple

Justinklined – use one of their digis

Charisma – song (All Shook Up – Elvis (had to be! LOL)

Crafts and Me – gems and sparkle

Shabby Tearoom – tag (on inside of card)

For today’s card, made especially for my brother-in-law’s birthday (same day as my son’s), I have made a shaped card - a speech bubble in gorgeous pearlescent cardstock.

The image is called ‘Throwback Fred’ from Justinklined, and I thought this Elvis imitator would be perfect for a male’s birthday card - and to that end at least, I must be onto a winner, as even my husband likes it….and he doesn’t usually say much about my cards!!! Coloured with Promarkers the image is simply matted onto embossed gold mirri and stripey paper rectangles whose corners I rounded to match those of the speech bubble. His outfit needed the necessary bling with added tiny gems and a mirri medallion completed his ensemble. I then made myself suitably shaped insert for inside, adding a similar but smaller embossed mirri rectangle with a tag emblazoned across the top, leaving room for the ‘To’ and ‘From’ (as if they would never have guessed anyway!?!?!) on the other side.

Kept it short and sweet today, but hope you like it! Sorry the photos are not up to much today, but the clouds are rolling in. :(

Tine :)

Sunday 5 September 2010

James

Challenges:
Friday Sketchers – design sketch

Creative Cottage – celebrations (his birthday)

Cupcake – digi (image and some papers)

Penny’s – Happy Birthday

Papertake – just the one (sentiment – if numbers count as a sentiment?!?!)

Secret Crafter – simple (no embossing, embellishments etc, just cut out paper/card)

Cards for Men – long summer days (he has spent his entire summer holiday from college shopping or window shopping!)

Charisma - song (Thea - Baby Boy)

Bee Crafty - use digi - but anything goes.
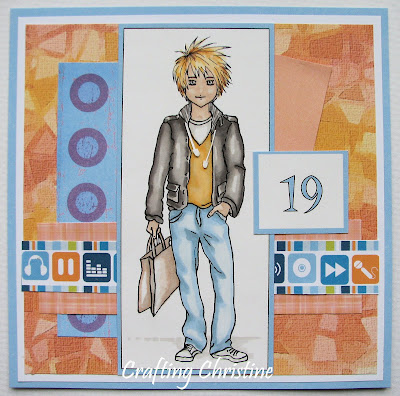
This is the card I have made for my son’s birthday which is coming up shortly. This is him, summed up – shopping bag in hand, earphones round neck and mobile phone in pocket somewhere. I have used one of a set of images available from Charmed Cards and Crafts called ‘Mikey’, though to make it more like my son other than giving him red hair, I have made a set of earphones for round his neck using a thin sliver of card (even the slight ‘flatness’ of that would be easier to adhere than say thread might be I thought), with tiny cut out shapes for the ear buds at the ends.

The main backing paper is a digi - one of TLC’s, and digis too are the stripes and musical symbols which are from Cardmaking & Papercraft, though the one with blue circles is from Brenda Pinnick. Whilst the layout might seem rather ‘busy’ at first glance, all the papers as well as the image were cut out using my trimmer rather than any Nesties etc, and without any stitching or further embellishments etc, I still feel it is rather simplistic and compared to some cards I make, relatively quick to do as well. LOL.

I am quite happy with this one –maybe because it sums my son up so well, even the colours. LOL. Hope you all like it too!

Tine :)

Thursday 2 September 2010

Digi Doodle #23 Use a Sentiment


The beautiful image of a young girl, lost in her own thoughts amongst the daisies is from Digi Doodle, of course, and is available here. For my card today, I coloured her with Promarkers though for her hat, I paper-pieced with a separate digi paper hoping to give the effect that it was made with a weave not dissimilar to a straw hat. That particular paper is from Crafter’s Companion, though the straw-like pattern is a little lost on the photo. I then went over the paper-piecing with my Promarkers to add shading and also some colour to the hat band.

I am sure most of you will recognise the backing papers I have used here as being from Tim Coffey at K & Company. Whilst hardly new designs, I love the subtlety of these coordinating papers which seemed just perfect to combine with this image. I used my Crop-a-Dile to add the eyelets into which I threaded a printed ribbon from my stash before mounting onto the base card which I only bought a few days ago but is not only a brilliantly thick gsm, it has such sparkle and depth of colour, it is totally gorgeous on its own.

The sentiment, the all important part of the Challenge on Digi Doodle this week, is from TLC and the mats are the same as for the image itself.

Hope you all like today’s creation especially for the Digi Doodle Challenge and I know the team there would love you to take part yourselves. Just remember to add a sentiment to your card this week.


Other Challenges:
Allsorts – park inspiration
Papertake - just one (one ribbon & one sentiment)

Crafty Emma – anything goes

Bee-Crafty – anything goes

Daisy Doodles – anything goes
Cute Card Thursday - fabric/material/ribbon.
Charisma - songs (Daisy a Day) .
Tine :)

Wednesday 1 September 2010

Nicecrane’s Little Mermaid


Hi everyone, and today I am using this beautiful image from Nicecrane Designs of the Little Mermaid. If you are a fan of giving & collecting ATCs, he has a choice of designs available from his on-line store, but he is expanding his range to include digital images, and this particular one is an example of his work.

I did not want to over complicate the layout and embellishments on this card, so that the total focus would be on this wonderful mermaid untangling her golden locks. I chose to use the sketch over at Sunday Sketch & Stamp, as it seemed to fit my criteria to a ‘T’.

I coloured the image with Promarkers, though I used chalks around the top edge of her oval mat. The background paper is a digi design on a CD from Create & Craft, which I chose as its design undulates like the sea and the scroll-work pattern reminded me of tossing seaweed. Onto this paper I dotted the tiniest gemstones I could find to represent the glistening sun on the waves. The border mat lying horizontally across the card has been sewn using the sewing machine, into stitched waves in the palest of blue - and then pearls dotted randomly either side of the image hopefully echo the sea theme.

I hope you all like my card for Ignacio over at Nicecrane Designs as I anticipate that I shall be creating more cards using his digis and ATCs in the weeks to come.

Challenges for this card:
Sunday Sketch & Stamp – design layout

Crafty Cardmakers – glitter and sparkle

Stamping Royalty – rhinestones and pearls
Cupcake - digis

Crafty Emma – anything goes

Daisy Doodle – anything goes

Bee Crafty – use a digi but anything goes

Stamping for the weekend – anything goes.

Tine :)

#30 Myth and Mystery – Siren of the Sea


This week’s challenge at I ♥ Promarkers is to make a card with the theme of Myth and Mystery – so there’s lots of choice if you think about it. Fairies, witches, wizards, dragons…. & I have gone for a mermaid, a siren of the sea so beautiful that she will lure an unwitting sailor to crash his wooden boat upon the rocks as he is drawn ever closer to her. Well, so the story goes…. My mermaid hasn’t set her sights on anyone at the moment, but is happily taking a lazy swim in the currents of the high seas. This young lady certainly isn’t a manatee..!

She is coloured with Promarkers (of course!), but I have also coloured her background with Promarkers, hoping to give the idea of a gentle current of water around her with darker, more turbulent waters to either side of her. The idea is that there is light dappling down from the surface above, catching the ebbing currents which move not only our mermaid’s hair as she relaxes, but also the seaweed on the ocean’s floor – well, I hope that is the effect I’ve got! LOL. She is coloured in such a way so she will blend easily into her environment – so it is harder to find her, naturally. LOL. The darker ‘waters’ at either side of her are additional layers on top of the original image/card, overlapping one another and the seaweed too, as I wanted the effect that we were catching a glimpse of her only because the water’s swell allowed us a peek at her. This was all then mounted onto glossy black card.

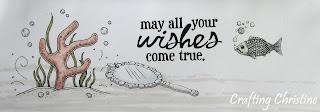
The lower half of the easel card has a background constructed of Promarker coloured cut strips, made in the same way as the darker side elements of the main part of the card, cutting my Promarker strips into undulating wave shapes and adhering to the glossy black card. The sentiment strip which holds the easel element in place features ‘Sea floor coral’, an image from Meljen Designs, but the the 3 other elements of the mirror, fish and sentiment itself are each from the prolific Paulette at TLC. Hopefully, it looks like she has just dropped the mirror and it has floated down to the seabed…LOL.

Well, I hope you will visit the blogs of the others on the DT to see how they have created their cards this week, and will feel suitably inspired to enter our challenge. Just remember to colour using Promarkers (don’t think you have to do it all with Promarkers like I have done – well chosen papers as backgrounds are the norm!), and I would love to visit your blogs to see which image you decided to use & how you have interpreted our challenge. Good luck!

I will enter my card for a few Challenges too:

Dare U To Digi Stamp – shaped card

Papertake – just the one (used no papers, just white card)

Bee Crafty – digi image but anything goes

Crafty Emma – anything goes.

Daisy Doodles - anything goes

Tine :)