Monday 13 August 2012

Mandy's Birds


Yes, I have indeed used Promarkers on my card this week it is just a little more 'discreet' than one of my 'normal' creations - if there is such a thing as 'normal!' LOL.

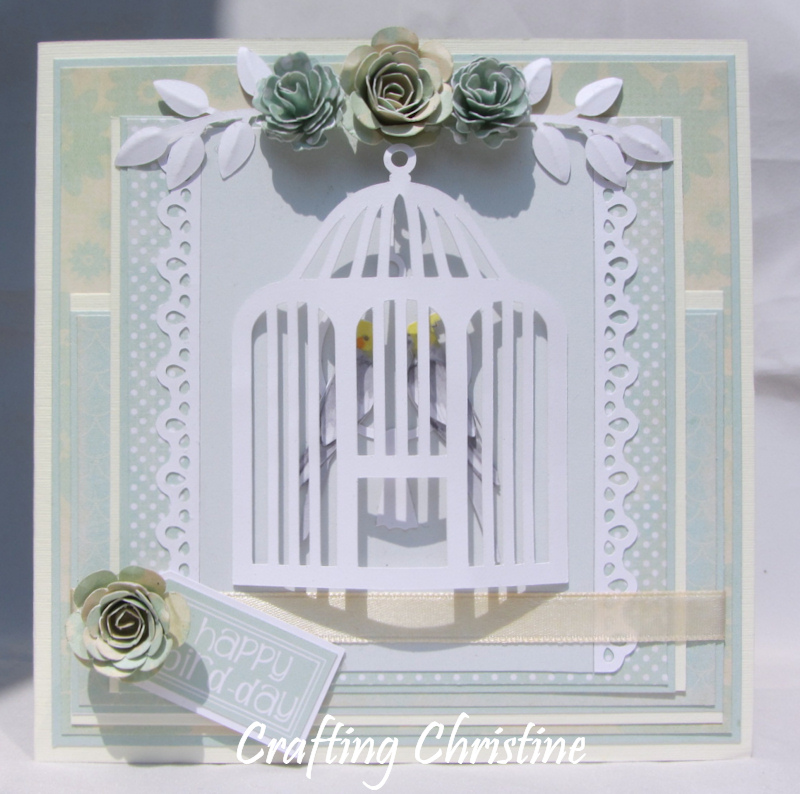
The card is for my sister-in-law who dotes on her two cockatiels.  As I like to make cards appropriate for my family & friends, a bird themed card it was - and whilst you probably can't see them very well hiding away behind the cage, I made myself a 3-layered cockatiel cut file and coloured each one with appropriate cockatiel markings using my Promarkers. The wings were put on with a dab of glue-gel so I could add dimension but of course, you can't see it properly because of the cage. LOL. Don't I make things unnecessarily difficult for myself? LOL. I then made a circular tasselled perch for them both to 'stand' on.

You can if you look carefully actually see the layers of the birds.
I didn't however, make the bird-cage itself.  This time I used one from a selection (birdcage3- from the appropriately named, Bird's Cards), bowing it out to accommodate my avian twosome.  Bird is also responsible for the two larger flowers (rolledflower1), I cut out of printed card stock, the leaves (branches1), which I embossed to give me the veins and even the sentiment, though I did re-colour this and put it in a tag. The smaller two flowers were a 5-petalled cut file from Pamela Conner, (thanks Pam).  I often have a love/hate relationship with my glue-gun when making my flowers. I need the fast-fix the glue-gun offers but I am useless at getting the right amount of glue out of it for my needs and then there are the copious amount of 'strings' emanating out of it. They go everywhere!!! LOL. Still, back on to the subject of my card,  I then got out my Promarkers once more and coloured my white satin ribbon with Ivory.


Now, of course I couldn't leave it there could I? LOL. So for the inside of my card I repeated my layered cockatiels but this time they are much larger - and just as naughty as my sister in law would recognise. They are coloured with Promarkers. One, slightly more placid cockatiel is just holding a recoloured greeting (from Bird's Cards) in his two-layered beak but the other mischievous creature is playing his favourite game of sitting on the picture frame and picking the wallpaper off!!!!  Yes, that is how they repay her when she allows them some freedom. LOL. As for the cut files here, other than the birds, I enlarged the same perch as I had created on the front and also made a bell hanging from a chain (with my SIL's name at the bottom). I added the layered frame so I can write the 'from' on later and this is 'hung' using some crochet thread onto the picture rail.


Thanks for looking.

Tine :)

Challenges I would like to enter are:
Great Impressions - walk on the wild side (animals but I hope Mandy's mischievous birds count! LOL)
That Craft Place - things with wings
Clearly I Stamp - things with wings
Scrapbook Sisters Card Challenge - things with wings
Digi Doodle - things with wings
Can You Digi It - bird is the word
Wags 'n' Whiskers - birthday
Corrosive - birthday
Divas By Design - for a female
Dream Valley - die cuts/punches
Poodles Parlour - die cuts
Totally Papercraft - frame it
Tammy's Scrapin' Corner - add flowers
Unstampabelles - paper flowers (no stamp or digi image either - for once I can comply, LOL)
Hooked on Craft - celebrate
Paper Crafting Journey - anything goes.

Thursday 9 August 2012

Floral Anniversary


Hi folks - I've been missing for a few days - have you missed me? LOL. My card on this occasion is for our anniversary, so is being given to my OH next week and yes, shock, horror - I haven't coloured it!!!

The navy card base has a fabulous scintillating silver all over it and the exact measurements of my centre-step design (cut using the Cameo), were done to fit the image from Floppy Latte called Floral Monogram Frame in the centre section. Yes, I am sure you can you see have been 'playing' with my Cameo again in order to cut out the 'Anniversary' sentiment into the front panel and also 'Love' into the back panel (keeping some room there of course so I can write the 'from' too.   I didn't colour the floral frame as I wanted the actual central cut-work to be the main focus.  However, maybe only fellow Silhouette users will be able to appreciate the amount of time & 'fiddly' nature of pulling out some of the image to create the decoration for the side panels - so that all the other parts of the image were removed. I also had to alter the size of the top of the lower-case 'a' by point- editing as it would have been too delicate & fragile otherwise.

On the back - a smaller variant of the front - leaving space for me to write too.
The front panel was added using foam pads but I kept the other panels nice and flat and adding a narrow navy ribbon as the only embellishment feature. So, a little different to one of my usual cards - mainly as I didn't get out a single Promarker, LOL, but keeping it white I was hoping for a more sophisticated card which was not too 'girly' either.

Front view - so you can see the both side panels.

Tine :)

Challenges I would like to enter this card for are:
Crafty Sentiments - CAS
365 (Monday) - CAS
Sparkles Forum - wedding/anniversary
Crafts & Me - use a digi
There She Goes - use a sentiment
Dream Valley - die cuts/punches
Love to Create - die cuts/punches
Di's Digis - no squares
PaperPlay - shaped card
For Your Inspiration - night scene photo
Inky Impressions - use ribbon
Lollipop - monochromatic
Catered Crop - use white
Through The Craft Room Door - white + two
Papertake - anything goes